Planetary Imaging Resources
My Imaging Train
The Design
The Imaging Train
The Imaging Train

The imaging train refers to all of the equipment that sits on the viewing end of the scope, the camera being the final piece of the puzzle. Although it is not as important for planetary imaging as it is for wide field, deep sky imaging, the placement of equipment in relation to your telescope's prime focus position is an important consideration.
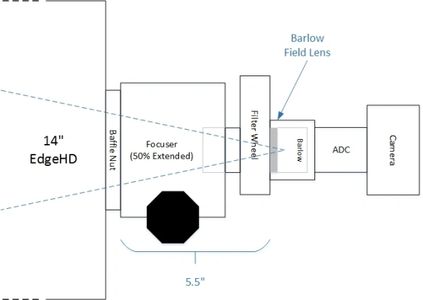
With my 14" EdgeHD, the prime focus position is 5.75" from its baffle nut. Therefore, guidance would suggest that the camera's sensor should be placed 5.75" from the baffle nut. The type of equipment that is placed between the baffle nut and camera can, however, complicate this determination. I do not pretend to fully understand the ins and outs of this, but I have asked enough questions to determine that a barlow lens has a dramatic effect. When using a barlow, the 5.75" should be measured from the baffle nut to the field lens (the lens closest to the telescope) of the barlow versus the downstream camera sensor.
The image above illustrates my design. I will achieve 5.5" of distance from the baffle nut to the barlow field lens versus the optimal 5.75". This is more than close enough for planetary and shorter is better than longer for Celestron SCTs.
The Imaging Train
The Imaging Train
The Imaging Train

This is what my actual imaging train looks like. It consists of a ZWO 5-position filter wheel, a T2 to T2 adapter within which either my 1.5x or 2x barlows reside. I use the 1.5x for my 290MC and Uranus-C cameras and the 2x with my 224MC, both connected to a ZWO ADC. Nice and compact. As per the design diagram above, the filter wheel end of this imaging train slides into the MoonLite Crayford-style focuser. This positions the field lens of the barlow at approximately 5.5" from the baffle nut. The barlows are unscrewed from their housing. The placement of them within the T2 to T2 adapter and its distance from the camera sensor determines its level magnification. I am aiming for F15-17 with the 1.5x and the 290MC/Uranus-C cameras and F20-22 with the 2x and the 224MC.
Cameras
ASI174MC
ASI174MC
ASI174MC

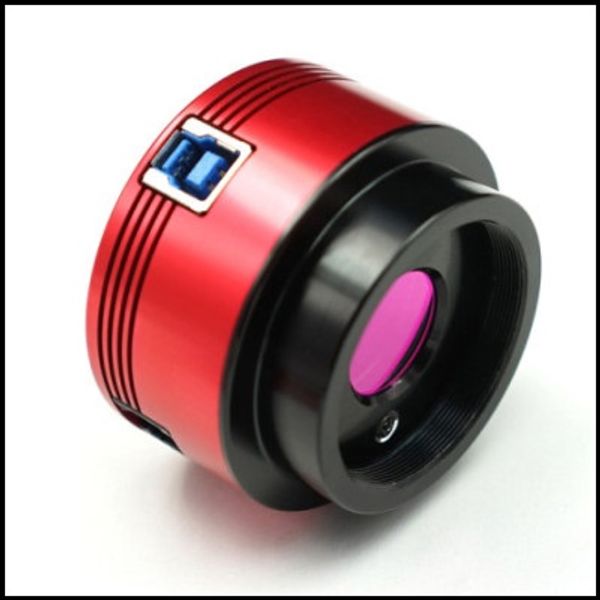
The ASI174MC is a USB 3.0 CMOS camera designed specifically for viewing the moon and the sun. However, it does do a nice job on the planets as well. It features a Sony Exmor IMX174 2.35MP sensor.
ASI224MC
ASI174MC
ASI174MC

The ASI224MC is a USB 3.0 CMOS camera designed for planetary viewing and is capable of small object deep sky imaging. It is considered one of the best planetary camera on the market today. It features a Sony IMX224/IMX225 1.2MP sensor.
ASI290MC
ASI290MC
ASI290MC

The ASI290MC is also a USB 3.0 CMOS camera designed for planetary imaging. It is similar to the 224MC, but its Sony IMX290/IMX291 2.1MP sensor provides a smaller pixel size for added flexibility when working with different focal lengths.
Uranus-C
ASI290MC
ASI290MC

The Uranus-C is developed by Player One Astronomy and utilizes the newest Sony IMX585 1/1.2” format color sensor. The 2.9um pixel size accommodates a well depth of 38.8Ke with a total of 8.3MP (the resolution is 3856 x 2180), and the diagonal is 12.85mm.
Software

FireCapture
I use FireCapture for capturing planetary video. It is an excellent program that is designed very well. It is maintained by Torsten Edelmann. In addition to controlling capture through my ZWO and Player One webcams, FireCapture has features for setting my ADC, focusing, controlling my filter wheel, and making minor mount adjustments. Although I have not used them yet, it also has autoguide capabilities.
The trick with FireCapture is to balance the settings in order to: 1) Maximize the frame rate of your camera; 2) Minimize the noise by keeping the gain as low as possible; and 3) Achieving a histogram (or light) level high enough for the object you are capturing.
You can learn more about FireCapture here.

AutoStakkert!
After I capture video using FireCapture, I then use AutoStakkert! to stack the best frames from my capture. Another excellent piece of software. It is maintained by Emil Kraaikanp. AutoStakkert! uses an algorithm to determine the quality of the individual frames within your capture video. For stacking, I usually select a percentage of my frames equal to the point where the quality drops to 50%. So if 40% of my 10,000 frame video are of 50% quality or higher, I'll instruct AutoStakkert! to stack an image containing the best 40% or 4,000 frames.
You can learn more about AutoStakkert! here.

Astra Image
Once I have a stacked image, I use Astra Image to sharpen the image using two separate features. I first use the Multi-scale Sharpen feature where I adjust the wavelets, usually setting all of them to their max as long as noticeable noise or artefacts aren't introduced. Next, I use the Deconvolution feature for further sharpening. This is usually a trial and error exercise where I slowly increase both the Strength and the Iterations until I am happy with the result.
You can learn more about Astra Image here.

Registax
Next, I use Registax to adjust (i.e. stretch) the histogram and balance the colours. I typically take my best 5-6 Astra Image results from a session and using Registax, balance their colours and tune the colour brightness in preparation for de-rotation in WinJupos.
You can learn more about Registax here.

WinJupos
The reason you can only take relatively short videos of the planets is due to their rotation. The planets in our solar system rotate at different rates. If you image for too long, the details you are trying to align during stacking will have rotated away from a common point on the planet's surface, blurring the image. The maximum capture length for Jupiter, for example, is 3-4 minutes. However, the more data (or frames) you include in your image, the crisper the details and the lower the noise level. That's where WinJupos comes in. It allows you to take multiple images, and then based on each image's time stamp, it de-rotates the images to a common point in time. Great tool! I usually use 5-6 sharpened images from within a 15-20 minute span and de-rotate and stack them in WinJupos. I then open the resulting image in either Astra Image or Registax and sharpen a little further using wavelet adjustments.
You can learn more about WinJupos here.

Adobe Photoshop CC
All of the software that I have mentioned thus far is free. The authors accept donations for their efforts, but there is no fee for obtaining and using the software. Adobe Photoshop CC is not free. Far from it. However, it is extremely useful in putting the final touches on a good planetary image. A must have, in my opinion. Damian Peach offers some great tutorials on Photoshop processing. I have found them invaluable.
You can learn more about Adobde Photoshop CC here.
Educational Sites

Cloudy Nights Forums
One of the best ways to learn in this hobby is to converse with others. The best place to do that is on the Coudy Nights Forums. Other imagers are eager to jump in and answer questions. Even if you don't ask questions yourself, reading the posts others create is an excellent way to learn. It's how I got started with panetary imaging. I had no idea where to start, and everything I stummbled upon originated in the Cloudy Nights Forum.
Be sure to visit Cloudy Nights here.

Damian Peach
There are some amazing planetary imagers out there. You can learn a lot by visiting their websites. In addition to great images, these folks also offer a wealth of information in terms tutorials, links to helpful online resources, tips and tricks, etc.
Damian Peach is one of the best. One of the first things I did when I got into planetary imaging is order his DVD tutorials from Starizona. They are fantastic, in my opinion. Easy to follow and very informative.
The image in this section is Damian's. Make no mistake - it is not mine! This is one of the best from Damian's website, which is located here. This is what is possible when you have good equipment, good skies, and the skills of Damian Peach!

Darryl Milika
Darryl Milika (aka "Mo" or "Kokatha Man") is also one of the best. He is also a regular contributor to Cloudy Nights as well. He will often chime in and answer a question, give advice to a newbie, or comment on the quality of an image. He also posts the results of his many imaging excursions throughout Australia, which are extremely informative.
The image in this section is Darryl's. Again, it is not mine! This is one of the best from Darryl's website, which is located here. Again, this is what is possible when you have good equipment, decent skies, and great skills mastered over many years' experience.
Tutorials
FireCapture Tutorials
Torsten Edelmann, the author of FireCapture, offers some great tutorials of the various features of FireCapture on his website. This is the introductory tutorial and is very useful to help you get started. All of his tutorials can be accessed through the FireCapture YouTube channel located here.
WarmWeatherGuy Tutorials
Steve, known as WarmWeatherGuy, has a very useful collection of tutorials on his website located here. He covers a wide variety of subjects, from image capture to porcessing and everything in between. This is one of his more useful tuorials on wavelet adjustments in Registax.